Blog Image

a n d r e a s . s c h u t z

CUBOT Note Plus – rooting

HobbyHacks Posted on Thu, January 17, 2019 23:31:41

I had to replace my smartphone.

Nowadays smartphones fall into the category “cornflakes tech”. Don’t get me wrong, I rely heavily on them, but I refuse to spend more money on computer stuff then I have to. I do have trouble understanding people that spend 10K SEK on a phone that get a cracked screen three months later.
I’d rather put as little money as possible on that kind of tech and do more pleasant things instead.
And with the growing hunger of Google, I always try to avoid leaking data as much as I can too.

That gives me some parameters to lean on:
* A hardware that just enough copes with what I need it to do.
* An android version that I can root and “own”.
* As cheap as possible.
* Use Yalp to “side load” apps so that a google account isn’t needed on the phone. As for now, Yalp is dead. I have to use APKpure which is not at all as good and clean and full with nastiness.

This time that rendered me a CUBOT Note plus.
Pretty good build quality with pretty good power, severely customized.

NOW IT IS TIME FOR THE DISCLAIMER… KNOW YOUR THINGS OR BE WILLING TO BRICK YOUR PHONE. PROMISE NOT TO WHINE OR GET MAD! IF YOU CAN’T STAND THE IDEA OF LOOSING YOUR PHONE, DON’T DO THIS! YOU HAVE BEEN WARNED.

If you want to do this you’ll need to root. Here is how I did that;

Prerequisites…
I do this in linux. I think the process will work in both windows and mac to, but I can’t guarantee that. But it looks as if all the tools are in there.
My phone came with the latest ROM so there where no need to OTA update it. But always start with as new ROM as possible because you will loose both warranty and the ability to do OTA updates when you root. These steps where made on an official v12 ROM from CUBOT.

I have niched to a certain chipset to ease the pain of reflashing the hardware in case you softbrick (you will do it eventually). In my case that means MTK chipsets. And I have “SP Flash tool” to revive the hardware if something goes south, but SP flash tool is NOT bundled in the zip i mention.

If you are new to ADB, play a while with harmless commands to get the hang of it before you start opening up bootloaders. Test to just “ls” and “cd” around to see what you have there.

I have made a zip-file for you so that you can save some time. You can download it here. Unzip the file, it will create a folder called “fastboot”. In that folder you will find all you need to root your CUBOT Note Plus. Here is how you do it:

1) Download and unzip. Then open a terminal in the folder “fastboot”.
2) Hook up your booted phone to a usb port. The phone needs to be in developer mode and usb debugging and oem unlock needs to be switched on.
3) Inside the folder “fastboot” you will find a rootchecker apk and a super-su zip. Transfer both of them to the phone. Internal storage or microsd card does not matter.
4) Write the command “./adb-linux reboot bootloader” to boot your phone into fastboot bootloader (which is a black screen with silly small text on).
5) Unlock bootloader by typing “./fastboot-linux oem unlock”. This will make the Notes Plus display an irritating message and wait in one minute when booting, but I don’t care, I don’t reboot a lot.
6) Now type command “./fastboot-linux boot recovery.img” to boot the phone on the file recovery.img that also resides in the “fastboot” folder. This will give you a ram loaded TWRP
7) Use TWRP to install the super-su zip that you transferred to the phone in step 3.
8) This step is optional, but you can install the busybox zip as well. Personally I like to install the busybox app later.
9) After install is ready, use TWRP to reboot you phone.
10) When booted, install rootchecker app from storage and verify root.

NOTICE
By the time of writing this, TWRP is so buggy and new so it can’t be permanently loaded (flashed) in a working state. Therefore we load it into ram, there it will work (touch screen drivers?) but on next restart it will be gone again.

BIG thanks to Cleopatra for his work with TWRP, guys like you deserve our respect.


Retro hacking Proove (Nexa) CodeSwitch units

HobbyHacks Posted on Wed, April 25, 2018 14:13:14

For every one still having some really old (and unbreakable) Proove/Nexa CS devices that now are too old to be compatible with the newer Code Learning systems. Here’s a Platformio project based on Digispark/Arduino as a development platform.

I guess this is really simple code and you can port it easily.

I used a lot of inspiration from Joakim Wesslens blog but rewrote his code to be smaller and more streamlined to what I am going to use it for. But I still kept is as a library and renamed it to work alongside Joakim’s library. At least that was the intention but I haven’t tested it.

Of course it is a zip-file, but in this brainwashed M$ world I was not allowed to upload anything else.


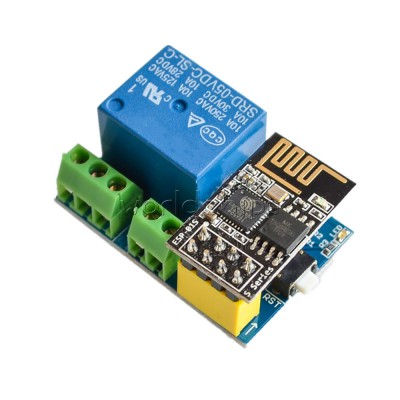
Espurna on ESP-01s and Relay shield v1.0

HobbyHacks Posted on Thu, January 25, 2018 21:54:10

I have been a follower of Xose Perez Espurna since long now. He is doing a fascinating job developing that firmware and the community has grown and thrived. Very inspiring indeed.

When I found Espurna I was brand new to the NodeMCU idea and the internet of things. But slowly I have gotten in to it. And today I managed to get Xose’s firmware to spark on an ESP-01s together with “Relay shield v1.0” that I modded so that the ESP-01s could autoboot when mounted on it. This is to my knowledge the cheapest and maybe also the smallest platform for running Espurna.

I got mine from Aliexpress for 21:72 SEK ( USD 2:70 ) including shipping to Sweden.

To get Espurna firmware in ESP-01s I used a programming adapter also from Aliexpress. This was the one I used. It was not a big deal, but you have to modify the GPIO settings for LED, Realy pin and button to remap those before you build and burn the firmware into the ESP-01s. I did this in the espurna/code/espurna/config/hardware.h file.

When I was done with flashing the firmware and attached the ESP-01s into the Relay shield the dissapointment was big… It didn’t boot. But after a while I understood that a lot of pins on ESP-01s have to be in certain states to get the device to boot from flash, and the relay shield did not fix that to my surprise.

So I modified the “Relay shield v1.0” like this…
* I connect the CH_PD pin to RST pin. It is the two lower pins in the middle of the connector in the picture below. I used a small piece from a component leg to bridge the two solder points. But maybe just a glob of tin will do.
* Connect a 10K Ohm resistor as a pull up to the GPIO0 pin. I did that by soldering a SMD resistor on the diagonal between VCC pin and GPIO0 pin.

Now everything booted!

There are some tradeoffs you should be aware of when you squeeze in Espuna in this little module.
* The TX pin also drives the blue diode. If you, like me, want an indicator LED for wifi, you can not simultaneously have the serial terminal. LED pin and TX pin will collide, but fortunately the LED took over.
* The button is connected to the RESET pin on ESP-01s so it can’t be used like we are used to on other Espurna platforms. I’m sure you can modify that to, but this will cut it just fine for me.

I hope you had some use of my information.


AKAI LPK25

HobbyHacks Posted on Tue, June 14, 2016 09:28:37

I got myself a small keyboard to use on the go. My choice was the Akai LPK25 because I found it very worth the price. According to me it is high quality and very affordable.

Together with my android phone and Caustic it makes one of the smallest DAW´s available.

As you know, I like to hack things. And wether you want to add a sound source to it or have to perform a repair or whatever… i found no pictures of the inside of an LPK25. That if something is a quality sign, isn´t it?

Well, pictures will be needed in the end, so my idea was to put some of them right here.

I also accidentally found some MIDI information from the software for this keyboard. Look:

F0 47 7F 76 61 00 0D – Sysex header (A_ K_ A_ I_ $$ $$ $$)
PR – Preset number 01 … 04
PM – Preset MIDI channel 00 … 0F (1..16)
OC – Octave 00 … 08 (-4 … 0 … +4)
TR – Transposition 00 … 18 (-12 .. 0 .. +12)
AE – Arp enable 00 … 01 (disable, enable)
AM – Arp mode 00 … 05 (up, down, inclusive, exclusive, random, order)
AT – Arp time division 00 … 07 (1/4 note, 1/4 triplet … 1/32 note, 1/32 triplet)
AC – Arp clock 00 … 01 (internal, external)
AL – Arp latch 00 … 01 (disable, enable)
TT – Tap tempo taps 00 … 03 (2 … 4)
TEMP – Tempo MSB 00 … 01 LSB 1E .. 7F (0 … 240)
AO – Arp octave 00 … 03 (0 … 3)
F7 – SF Sysex finished

$$ = Command

Message sent at startup
F0 47 7F 76 62 00 01 01 F7
F0 47 7F 76 64 00 00 F7
F0 7E 00 06 01 F7
F0 47 7F 76 64 00 00 F7
F0 7E 00 06 01 F7
F0 47 7F 76 64 00 00 F7
F0 7E 00 06 01 F7
F0 47 7F 76 64 00 00 F7
F0 7E 00 06 01 F7

Request Preset

A_ K_ A_ I_ $$ $$ $$ PR SF
F0 47 7F 76 63 00 01 01 F7

Change Settings
A_ K_ A_ I_ $$ $$ $$ PR PM OC TR AE AM AT AC AL TT Tempo AO SF
F0 47 7F 76 61 00 0D 01 00 04 0C 00 03 04 00 01 03 00 78 00 F7


F0 47 7F 76 61 00 0D 04 00 04 0C 00 04 04 00 01 03 00 78 00 F7

I also found a fantastic software called “Ctrlr”. Have a look at their wesite.
This made me able to write my own interface to control the settings for the presets on the keyboard. Ctrlr is multiplatform so now you (and I) can control the LPK25 from Linux to.

Here is a link to my “panel” as Ctrlr calls it.

Please send an e-mail if you have questions.


Attaching to a test pin

HobbyHacks Posted on Wed, January 13, 2016 14:54:48

Hi

After some thorough search on internet about how to attach probes or wires to PCB test points, I found some usefult ideas, but all of them where to “clumsy” for me to use. I somehow got a flash of enlightenment and I would like to share it here! smiley

This is my version of a quick and dirty testclip with very high precicion. I’ll let the pictures speak for them selves.


Well, I may not win the nobel prize… but I find them handy anyhow.


Hack-a-pad

HobbyHacks Posted on Fri, November 08, 2013 10:58:48

STILL UNDER CONSTRUCTION – PLEASE BE PATIENT

I have always been interested in the low cost Android pads that you can buy from international webshops you find all over internet.

Yes, you have to be careful with you creditcard and you have to be careful with what you buy. I always have that “lump in my stomach” feeling until my stuff arrives and I can examine it. But so far I have ordered not less than 8 gizmos and NONE have failed to live up to my expectations. Not always high quality, but in those cases that have been expected and the money have been “peanuts”. If you ask me, no flops.

One thing you have to count in if you buy a pad from the low price
markets is no support what so ever. You have to be able to hack away on
your device all by yourself or use it as is with the often rather “quick and dirty” software it ships with. You should see at as “raw hardware” without the nice (but rigid) ecosystem that the big well known vendors offer you.

The latest little toy I ordered was an XPad from Pandawill and it arrived fast and sound and the hardware shot high over my expectations.

Anyway, I have now prepared the XPad to be my companion in every day life and here comes that story.

The XPad has a retina display, a quadcore cortex A9 Rockchip RK3188 processor and a MALI400 GPU. 10000 mAh battery and a well built aluminium/plastic chassis.

When it arrived it had a mediocre OS and performed worse than my old ASUS TF101. Reboots where frequent and the battery lasted maybe 4hours. It was unrooted and full of bloatware.

After a summer and some months it is now beginning to take over the older singlecore ASUS as my “workhorse”. To allow you to benefit from my work (maybe you don’t like the internet trenches as much as I do?) I will try to explain what and how I have done the transformation.

Step1 – Read up.
The easiest way to start is to widen the idea of what machine you have bought. The chance that your machine is sold by other companies under other brands is something you even should investigate BEFORE you consider buying the pad. Why so? Well, if you are like me you will want to team up with other souls that have bought a compatible machine and that want to develop and test as mouch as you do.
So from what I have gained after weeks on forums and with test is that the XPad is built from hardware that also exists in the following pads:

Yuandao VIDO N90FHDRK, Cube U9GT5, VISTURE V97HD, 97RQ and XPad

I am sure there are more, and please drop me a comment if you are sure you know more compatible pads. There also may be some hardware differences on the listed pads, but I havent found out what they are.

Step2 – Root
Now that you know compatible models, you attack via Google. Browse through forums and search for information and if you are lucky you will find people that have already made some of your job. Specifically you should try to find a rooted rom. So far it doesnt have to bee a good stable rom. Just the root in it self is the portal to your control. If you dont find a ready rooted rom you have to do it yourself. Then read up and try methods like TPSparky and motochopper, but theese things move fast and while writing this some of the tools may have become obsolete and some may have evolved to be the next killer tool.

Too start with you will have to use a computer. XP is easy and small but the latest root I made trough a linux (openSuSE) box and I think that was easier than my fiddlings with XP. Anyhow, the computer is used to get use of tools like RKFlash and XXX. With tools like this you can “unbrick” devices by putting them i a “Flash me please” mode and then download an image via USB. If you are lucky and have found a good stable rom you like, you can now jump to step3.

If not so lucky, your next step is to establish a connection with the Android Debug Bridge, ADB, to get into the OS as root and to be able to write to the system partition. With ADB you can manually root your device when you have knowledge enough. Until you have, you can use root-scripts like the ones I have mentioned above. Lately it feels like Googles attitude towards the open source attitude is getting colder. The last ADB was designed with a lot of mechanisms to prevent you from communicating with every device. And I don’t see the good in whitelists with pre included vendors, that smells like Microsoft.

Step3 – Custom recovery
On the way towards OS excellence you will have to re-invent your OS again and again. You will want to try new images and you will want to revert to where you where before trying the new.
That is why custom recoverys like CWM recovery and TWRP is like water in a desert. Unless you are one of the developers of a custom recovery you will silently praise the people that have made theese recoverys. They will literally save you a number of times if you poke around in you rom. If you ever have considered donating I think this is a good place.

Step4 – Apps
So now you have a cool powerful device that you have full control over and you can trim to your likage. I alway start with trimming away bloatware. Simple is beautiful and you can now go as far as you like or the OS crashes. If you are like me you can cut out Google and stop worrying about your paranoid side. With file browsers like ES you kan build your own “play” and store good to have apps on a micro sdhc card. Just remember that unless your apps have “in app uppdates” you will loose update popups.

I updated my xpad to android 4.4.2 (Oma’s version) yesterday and apart from the web browser everything works well. I will do more tests.

UPDATE
I have now flashed my xpad again, Oma’s team is amazing. Here you will find the 4.4.4 version of Android. My tip is to replace the kernel.img inside the download package with this kernel from DragonTouch before you flash it. It is the fastest kernel for this pad that I have seen. There is also a .zip file that you can use with CWM recovery to add some fixes to this model. Only problen I got was that the autorotate feature rotates the screen wrong (the autorotate can be shut off).


Kommer vi dit?

HobbyHacks Posted on Tue, June 26, 2012 15:40:56

Kommer vi någonsin att komma dit?
Eller borde jag bara undra hur fort vi kommer att komma dit?

Vadå vadå?
Okey, jag skall ta det från början.

Mitt senaste inköp i teknikväg är en CX-01. Det är en mini-android-PC som i dag säljs som ett mediacenter på sticka.
För som du vet så hade vi först PC’s, sedan laptops och sedan pads. Och nu… PC-on-a-stick.

Så vart kommer vi då att komma? Jo till att vi använder PC-stickorna på jobbet.

Hur kan jag påstå det? Enkelt… tycker jag just nu i alla fall. Prova på tankeexperimentet att mappa priset mot enheterna så ser du vad jag menar. Ungefär så här;

PC – 12000:-
Laptop – 9000:-
Pad- 6000:-
Sticka – 1000:-

Skall jag vara riktigt ärlig så betalade jag bara $55 för min CX-01 och det är ju knappa fyrahundra i dag. Men man måste väl i ärlighetens namn ge den en skärm, ett tangentbord och en mus också för att kunna kalla den en PC. Jo, än så länge i alla fall.

Fortsätt tankeexperimentet och fundera som ett företag. Hur kan jag ge mina anställda redskap nog att arbeta och i samma veva slippa betala en massa pengar?
Om jag som företagare kunde ge mina anställda ett fullgott redskap för att tex. köra en office-svit och komma undan med en tusenlapp i stället för att punga ut med sex så skulle jag göra det.

Voila!


En iPhone!

HobbyHacks Posted on Wed, November 04, 2009 11:23:13

…har blivit min!

Det var länge sedan jag ägde en produkt från Apple och nu har det visst blivit dags igen. Fick erbjudandet av min fars vän att köpa en iPhone med spräckt skärm. Som ni vet vid det här laget var det ett alldeles för lockande erbjudande för en geek som mig.
Telefonen tingade ett pris på 1500 kronor och reservdelarna gick på ca. 300 kronor inklusive frakt. Så till ett totalpris av 1800 kronor skulle jag få en iPhone! Det gick inte att motstå. Jag nappade!

Så vad tycker jag då om min nykomling? För det första, ryktet om iPhone’s suveränitet är KRAFTIGT överdrivet. Om hälften av alla som lovordar den skulle äga en så hade det varit annat ljud i skällan. För det andra så är den inte särskilt “kunnig” som telefon. Om jag jämför den med min “gamla” Nokia 5310 Xpress music så känns iPhonen faktiskt lite spartansk.
Men den är snygg, rysligt snygg och känslan av “dyrgrip” eller juvel osar lyxigt och tungt runt den. Den är en glädje att hantera och “tafsa” på och det förlåter ganska mycket av dess inkompetens.

Sist men inte minst så går den att hacka, Jag tror att det tog en timme innan jag hade jailbreak’at den och fått konsollaccess på den. Och det behövs faktiskt, bristerna i Apple’s interface gör att man då och då måste in i operativsystemet och radera någon databas eller starta om något som inte längre svarar.

Tyvärr så får man ju då för första gången tillgång till filsystemet och chans att uppleva det. osX i all ära men gud så långt borta dom är i sitt operativsystem. Det känns i bästa fall som en linux a’la -95, men i stort så är det rätt bedrövligt. Osystematiskt, tillkrånglat och specialdesignat för användarovänlighet. Darwin/osX och Apple har enligt mig MYCKET att lära av Linux och open source.

Och kanske är det det som är den ultimata iPhonen. Jag läste att ett team håller på att porta debian till den. Bra idé. Åtminstonde för mig låter iPhone hårdvaran med ubuntu på som den ultimata PDA’n.


Next »