
STILL UNDER CONSTRUCTION – PLEASE BE PATIENT
I have always been interested in the low cost Android pads that you can buy from international webshops you find all over internet.
Yes, you have to be careful with you creditcard and you have to be careful with what you buy. I always have that “lump in my stomach” feeling until my stuff arrives and I can examine it. But so far I have ordered not less than 8 gizmos and NONE have failed to live up to my expectations. Not always high quality, but in those cases that have been expected and the money have been “peanuts”. If you ask me, no flops.
One thing you have to count in if you buy a pad from the low price
markets is no support what so ever. You have to be able to hack away on
your device all by yourself or use it as is with the often rather “quick and dirty” software it ships with. You should see at as “raw hardware” without the nice (but rigid) ecosystem that the big well known vendors offer you.
The latest little toy I ordered was an XPad from Pandawill and it arrived fast and sound and the hardware shot high over my expectations.
Anyway, I have now prepared the XPad to be my companion in every day life and here comes that story.
The XPad has a retina display, a quadcore cortex A9 Rockchip RK3188 processor and a MALI400 GPU. 10000 mAh battery and a well built aluminium/plastic chassis.
When it arrived it had a mediocre OS and performed worse than my old ASUS TF101. Reboots where frequent and the battery lasted maybe 4hours. It was unrooted and full of bloatware.
After a summer and some months it is now beginning to take over the older singlecore ASUS as my “workhorse”. To allow you to benefit from my work (maybe you don’t like the internet trenches as much as I do?) I will try to explain what and how I have done the transformation.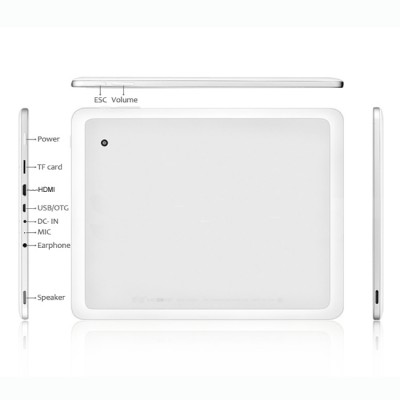
Step1 – Read up.
The easiest way to start is to widen the idea of what machine you have bought. The chance that your machine is sold by other companies under other brands is something you even should investigate BEFORE you consider buying the pad. Why so? Well, if you are like me you will want to team up with other souls that have bought a compatible machine and that want to develop and test as mouch as you do.
So from what I have gained after weeks on forums and with test is that the XPad is built from hardware that also exists in the following pads:
Yuandao VIDO N90FHDRK, Cube U9GT5, VISTURE V97HD, 97RQ and XPad
I am sure there are more, and please drop me a comment if you are sure you know more compatible pads. There also may be some hardware differences on the listed pads, but I havent found out what they are.
Step2 – Root
Now that you know compatible models, you attack via Google. Browse through forums and search for information and if you are lucky you will find people that have already made some of your job. Specifically you should try to find a rooted rom. So far it doesnt have to bee a good stable rom. Just the root in it self is the portal to your control. If you dont find a ready rooted rom you have to do it yourself. Then read up and try methods like TPSparky and motochopper, but theese things move fast and while writing this some of the tools may have become obsolete and some may have evolved to be the next killer tool.
Too start with you will have to use a computer. XP is easy and small but the latest root I made trough a linux (openSuSE) box and I think that was easier than my fiddlings with XP. Anyhow, the computer is used to get use of tools like RKFlash and XXX. With tools like this you can “unbrick” devices by putting them i a “Flash me please” mode and then download an image via USB. If you are lucky and have found a good stable rom you like, you can now jump to step3.
If not so lucky, your next step is to establish a connection with the Android Debug Bridge, ADB, to get into the OS as root and to be able to write to the system partition. With ADB you can manually root your device when you have knowledge enough. Until you have, you can use root-scripts like the ones I have mentioned above. Lately it feels like Googles attitude towards the open source attitude is getting colder. The last ADB was designed with a lot of mechanisms to prevent you from communicating with every device. And I don’t see the good in whitelists with pre included vendors, that smells like Microsoft.
Step3 – Custom recovery
On the way towards OS excellence you will have to re-invent your OS again and again. You will want to try new images and you will want to revert to where you where before trying the new.
That is why custom recoverys like CWM recovery and TWRP is like water in a desert. Unless you are one of the developers of a custom recovery you will silently praise the people that have made theese recoverys. They will literally save you a number of times if you poke around in you rom. If you ever have considered donating I think this is a good place.
Step4 – Apps
So now you have a cool powerful device that you have full control over and you can trim to your likage. I alway start with trimming away bloatware. Simple is beautiful and you can now go as far as you like or the OS crashes. If you are like me you can cut out Google and stop worrying about your paranoid side. With file browsers like ES you kan build your own “play” and store good to have apps on a micro sdhc card. Just remember that unless your apps have “in app uppdates” you will loose update popups.
I updated my xpad to android 4.4.2 (Oma’s version) yesterday and apart from the web browser everything works well. I will do more tests.
UPDATE
I have now flashed my xpad again, Oma’s team is amazing. Here you will find the 4.4.4 version of Android. My tip is to replace the kernel.img inside the download package with this kernel from DragonTouch before you flash it. It is the fastest kernel for this pad that I have seen. There is also a .zip file that you can use with CWM recovery to add some fixes to this model. Only problen I got was that the autorotate feature rotates the screen wrong (the autorotate can be shut off).
